Sunday 2 February 2014

Root Uninstaller Pro


Description

Don't like stock or system applications? It's for you. This application can freeze pre-installed applications on your phone and more.
*** If your phone does not root, recommend to use my "App Tyrant" app ***
Very fast and simple uninstaller tool on single click for uninstalling both SYSTEM and REGULAR applications.
For ROOT+NAND unlocked devices
☆ Uninstall system applications
☆ Freeze or disable bloatware, stock and regular applications (keep updates)
☆ Defrost or enable applications (Free trial or PRO)
☆ Backup system application .apk to sdcard (that can reinstall later)
☆ Restore backed up applications
☆ Reset applications to fresh install state
☆ Delete definitively system applications
☆ Hide my App: launch a frozen app and automatically re-freeze on app closing (Pro only, tap on Launch->Freeze button )
☆ Explore application data folder, code folder (ex. edit preferences, need AntTek File Explorer)
For NON-ROOT devices
☆ Quick APK list to show all available .APK files on SDCard
☆ Keep Market reference and can restore after factory reset/change devices
☆ Manage to clear data, cache (manually)
☆ Manage .apk files: delete, install, install as a system app (PRO)
☆ Single click to uninstall a listed applications (Batch uninstall).
☆ Rapid load application list
☆ Display application name, icon, package name
☆ Exclude system applications (that you can not uninstall)
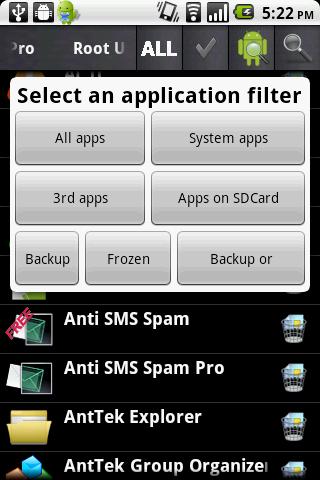
☆ Filter by third-party applications, system applications, applications on sdcard. backup applications or frozen applications
☆ Support large screen (ex. tablet) views
☆ Explore application data folder, code folder (ex. edit preferences, need AntTek File Explorer)
Trial on Free version :
☆ Three times to defrost or restore apps for Free version
IMPORTANT***IMPORTANT***
☆ Make sure you app is granted by SuperUser
☆ If you CANN'T freeze/defrost, try to enable USB Debugging (HOME/Settings/Application/Development/USB Debugging)
☆ If you CANN'T restore backup app, try to "find apps on SD card" then long-press the app and select "install as system app".
☆ This application uses SDCARD to store data
☆ PRO and FREE version are fully compatible
NOTES
- Some phones (ex. Desire) requires NAND unlocked (see more here http://alpharev.nl/).
- INTERNET/ ACCESS_NETWORK_STATE/ ACCESS_COARSE_LOCATION are required for displaying AdMob. The PRO version does not require these permissions.
# bloatware remover, bloat freezer, system app remover, system app uninstaller, system app freezer
Assistant request: rootuninstaller@gmail.com
Web site: http://rootuninstaller.com
Troubleshooting: http://rootuninstaller.com/qa/
Translation: http://www.getlocalization.com/rootuninstaller/
Facebook: https://www.facebook.com/pages/Root-Uninstaller/200912803368166

Download

Mirror
:Video:


Saturday 1 February 2014

ROEHSOFT RAM Expander (SWAP)


Description

Please check your device for compatibility before you purchase this app with
'MemoryInfo & Swapfilecheck' to find it see my other apps.
This is the most powerful Release ever! Exclusive only here in Play Store!
Insufficient RAM, memory is too small? Use your SD card as a working memory expansion! A Memory Manager wich make's you life more easy as you think...
A great programmer once said to insufficient RAM -RAM only helps-. Convince yourself how right this man had.
Finally, more memory with a click! Memory from Android 1.6 up with root access and external SD card! More memory means that background tasks will never more automaticaly terminated, and many programs will work correctly in the first place!
On many devices, there are problems with games require a lot of memory, this fixes the problems RAMEXPANDER. And they can play latest games on devices that otherwise would not be able to start such APPs. No more out of memory! No more memory is full!
Languages: English and German
Note: please try before you buy with our app "https://play.google.com/store/apps/details?id=com.roehsoft.meminfo" whether their device ROEHSOFT RAM Expander is compatible, you!
- Free SD card memory as a RAM use (SWAP RAM / SWAP MEMORY)
- Swapfile RAM expansion up to 4.0 GB (file system limit)
- No limit on SWAP partition!
- The usual performance degradation when paged not occur with sd card from class-8
- Widget for PNP swap (swap on / off swap)
- Detailed Memory Information & Analysis
- Autorun
- Swappiness kernel parameter set
- Easy foolproof use
  (1 click optimization and automatic calculation)
- Supporting Tung all Android devices (root access and Kernelswap support)
Note: please try before you buy with our app "https://play.google.com/store/apps/details?id=com.roehsoft.meminfo" whether their device ROEHSOFT RAM Expander is compatible, you!
Should it come to problems please contact me before they write such queries to review forum!
not enough memory? equal to no more! More games to play and run more applications simultaneously! All you have to only increase your memory. And up to 4 GB! Larger memory, instead of using task killer or memory optimizer.
ROEHSOFT Ram Expander is more effective than any other tool of its kind Why? The First find out!
ROEHSOFT RAM expander support via a widget at lightning speed and off of extended memory.
This way you can remove the SD card despite swapfile or deploy via USB.
Also, you can important, elementary the swap kernel parameters even control the effectiveness of extended memory increase.
To gain root access you Linkk this helps any further http://shortfuse.org/.
Just affordable entry level phones often have little Ram, help either here or Task Killer programs continue but one uses a swapfile, which is enough memory available. ROEHSOFT Expander turns your device more easily. Many applications, you can start at the same time and do not have to worry about your Ram.
Extends every Android device up to 4 GB of memory in which it creates a swap file on the SDCARD.
Maximum size of the swap file is architecture requires 4GB!
By setting the swappiness value, you can control the behavior of the kernel, the higher the value the more is outsourced.
Please note! For any damage that may result from the use of this software are not responsible!

Download

Mirror
:Video:


Chainfire3D Pro


Description

Take control over your GPU!
Chainfire3D is an intermediary OpenGL driver. What does that mean? It means that Chainfire3D sits between your apps and the graphics drivers, and can intercept and/or change commands between the two. It has some built-in functions, and can be further extended with plugins to provide extra functionality.
!! For Froyo and Gingerbread ONLY. NOT COMPATIBLE with Honeycomb/Ice Cream Sandwich/Jelly Bean !!
!! Chainfire3D is for 1ghz+ devices only !!
!! ROOT is required for this program, as well as a writable /system partition. S-OFF is also required on HTC devices !!
Features include reducing texture size and quality to reduce memory use and potentially increase game performance, as well as increasing memory use potentially increase performance.
If you also install the (experimental) EGL driver, AND your GPU supports it, AND you have the Pro version, you can enable 4xMSAA or 16xMSAA on a per-app bases. This can drastically improve image quality!
Be sure to check the thread on XDA for available plugins !
( http://forum.xda-developers.com/showthread.php?t=1087427 )
Chainfire3D has been tested on:
- HTC HD2
- Samsung Galaxy S
- Samsung Galaxy Tab 7"
- Samsung Galaxy S II
- Samsung Galaxy Note
- Samsung Epic 4G
- Motorola Atrix 4G
- Motorola Droid 2
- LG Optimus 2X
- Google Nexus S
Many users are running Chainfire3D on devices not listed here - it's likely to work on all modern devices. So far nobody has reported a failed install, so that's good. Doesn't mean problems can't happen.
!! There is some risk involved installing the driver. Your device may not boot. If you have CWM, it would be prudent to create a backup before installing !!

 Download
Download

 Mirror
 Mirror
:Video:


Superuser For Android


Description

Grant and manage Superuser rights for your phone.
This app requires that you already have root, or a custom recovery image to work.
Note: App and binary will have different versions. The app is updated more often than the binary is.
This app cannot be uninstalled if it was installed with your ROM or root. If there is no uninstall option, it's because you placed it in /system/app, not me. It is impossible for an app to be installed in /system/app by the Play store. In fact, the entire /system partition is read only at runtime. The only way for an app to be placed in /system/app is via a rooting process (which usually installs Superuser), or by remounting the system partition as read/write and manually putting it there.
Permissions requested are for:
Internet - updating the binary
External storage - backup/restore for elite users
NFC - creating an allow tag for elite users
Boot completed - fix database on boot
Support request emails that simply say "Doesn't work" or something to that effect are automatically deleted by our stupidity filter and will not be answered.

For More Details :Click Here
 Download
Download

 Mirror
Mirror
:Video:


ROM Manager By ClockworkMod


Description


ROM Manager is THE MUST HAVE APP for any Android root user. (Over 10 million downloads and counting!)
* Flash your recovery to the latest and greatest ClockworkMod recovery.
* Manage your ROMs via a handy UI.
* Organize and perform backups and restores from within Android!
* Install ROMs from your SD card.
* Install your favorite ROMs over the air!
Premium Version:
* Incremental update zips (save your data plan!)
* Premium ROMs
* Receive notifications for when your ROM is updated!
* Automatic backups
* Install Queue
* Web Connect
* Backup Download Server lets you easily transfer backups as flashable zips to your computer.
Do you prefer using only recovery manually? Check out the Touch Recovery in app purchase, for the most advanced recovery available!
Why does ROM Manager ask for account permissions?
Web Connect only needs to access your Google account to connect it to your google account. It can't access any private data or passwords.
ClockworkMod Touch Recovery:
ClockworkMod Touch recovery (and recovery) is work that needs to put in for every new device that is released by a manufacturer.
If work on ROM Manager ceased completely, all the premium features would continue working without issue. However, new recoveries do not port and build themselves. Without ClockworkMod Touch being a per device purchase, there is no way to recoup recurring server costs and labor. Keeping ROM Manager free and operational costs tens of thousands of dollars a year, and that does not include engineering costs.
Your support is appreciated.
Troubleshooting:
Droid users: Stuck at the "M" logo? Flash an alternate recovery and flash back to ClockworkMod.
HTC Users: Flash recovery not working? Try fastbooting a recovery on.
Droid X/2/Pro Users: You must run the Bootstrap application first to use ROM Manager.
Samsung users: You must flash a Clockwork compatible kernel first (see XDA forums)
IF YOU ARE HAVING LICENSE ISSUES, MAKE SURE YOU HAVE THE LATEST VERSION OF FREE (4.0+) AND THE LATEST LICENSE (1.0.8+) INSTALLED!

 Download
Download

 Mirror
Mirror
:Video:


How to use Titanium Backup


Titanium Backup has been one of the most popular apps on the market for some time, and with good reason. It can be used to backup all your important app dada, system data, and even WiFi passwords on your handset.

Now, Android is a very stable operating system, and it’s pretty rare to run into a system or app killing bug. Even so, it’s better to be safe than sorry, you never know when a crippling update or malicious app might cause a problem. If you’re planning on removing apps using your newly found root permission or are planning to install custom versions of Android, then backing up your device is essential.

First things first, you’ll need a rooted handset before you can use Titanium Backup. Following that the app will need to be granted root permissions on your handset, but that’s simple enough. You’ll be prompted by Superuser once you run Titanium Backup, and can select to give it permanent access so you won’t be prompted again.

One word of caution before we proceed. If you’re using Titanium Backup to restore apps in between installing ROMs DO NOT attempt to restore system apps or their data across ROMs, as this will cause all sorts of crashes. Individual apps work fine, but system data will be incompatible.

Now that everything is setup we can begin.

Performing a mass backup

At first glance, Titanium Backup doesn’t appear to have the friendliest looking interface, the black and grey theme could certainly use a makeover. But don’t let that put you off, everything you need is actually very easy to find.

Frustratingly though, probably the most useful tool for performing a mass backup is actually hidden in another menu, rather than on the Backup/Restore tab where you’d think it would be. Instead, click the Menu button on your handset, and then select the “Batch actions” option under the “General” section, it should be the second option on the list.

TI making a backup

Batch actions can be accessed from your devices menu button, or via the icon in the top left of Titanium’s home screen.
The all-important backup section is located right here, giving you a wide variety of options regarding app and system data. System data includes Bookmarks, WiFi information, calendar events, etc. If you’re performing a backup for the first time then want to use the “Backup all user apps + system data” option, or at the very least the “all user apps” function. Clicking “Run” will present you with several more options to refine exactly what you’d like to backup. Once you’re satisfied with the selection, tap the green tick in the top right to begin the backup.

Patience is the key here as this can take a while, especially if you have lots of large apps installed.

If you’ve performed backups in the past and simply want to make a backup of newer apps you’ve installed recently, the “Backup new user apps” option on the “Batch actions” menu is the best choice. Alternatively, you can use the “Backup/Restore” tab on the Titanium homepage to select individual apps to backup.

Creating a recovery backup .zip file

Whilst the above backups will protect you from most bugs, they won’t be of much use if you experience a severe error that prevents your device from booting properly, such as corruption in a system file, or a bugged out launcher. This is where recovery compatible .zip files come in handy, as the backup can be restored without having to boot into Android. However, this is a donate version only option, but might be worthwhile if you’re changing ROMs a lot.

Head on over to the batch options again and scroll down until you see the “Recovery Mode” category. Here you can select the apps that you’d like to include in the backup .zip file, choose between apps or data only, and name the .zip file appropriately so that you can remember what it is.

If you ever need to recover your device using this boot file, enter ClockworkMod recovery and choose install zip from SDCard.

Scheduled backups

Generating a backup every time you install a new app is a bit of a pain, and it’s unlikely that anyone will remember to make a backup every week or month anyway. Fortunately, Titanium Backup now includes a scheduled backup option.

Over on the main menu tap the “Schedules” tab and you’ll be presented with two options. The first choice labelled “redo backups for modified data” will schedule backups only for app data which have been changed since the last backup. This could include games or changes make to specific app data.

TI schedule
The schedule has plenty of options to control automatic backups, so you don’t have to mess around with Titanium regularly.
The second option is probably the most important, as it will backup any new apps, system data, and updates since the previous update. Click “edit” to make changes to the schedule. There are all the necessary options to adjust the time and date of when backups are generated, but users can also set the charge state of the device required before making a backup, so as to prevent shutdowns mid backup, and there’s also a choice regarding filters and what to do once the backup has completed.

Restoring from backup

Alright, you’re protected in case your handset suffers a minor meltdown, but the next important step is being able to restore your apps and settings should anything go wrong.

In the batch actions, yet again, you’ll find a list of options for mass restoring your data. “Restore missing apps with data” will replace any content that is missing from your handset after a wipe. Alternatively restoring all apps with data will replace any existing apps with the backed up versions of them created earlier. There’s also a rather helpful option to only restore newer versions of user apps if you’re reinstalling your system.

However, the option that’ll you’ll most likely be interested is the “restore missing apps + all system data” option, which will put everything back to where it was when you created the backup. Although I can’t stress enough, that system data shouldn’t be restore if you’re switching ROMs.

TI restore options

Batch and individual restores can both be performed. There are also some additional commands when looking up the options for each app.
If you discover that a specific app has developed a fault, say after a bugged update, and you want to restore it to a previously saved version, then this can be done by clicking on the backup/restore option on the main page. Here you can pick the specific app or piece of data from the list. Once tapped, a list of backups will appear along with a list of other functions to create backups, etc. Here you can manage your individual app backups, or can restore the app to a specific date by clicking on the corresponding restore button.

Managing bloatware

Whilst looking at the specific apps you’ll probably have noticed the Freeze function. Freezing apps is a handy tool that will allow you to completely stop apps from running without having to uninstall them. Usually this is used on factory installed apps that you don’t want to use. This option is a paid for only function, but it’s very helpful if you want to stop an irritating tasks from running or to see how your handset will react before uninstalling a piece of software.

Root permission also means that Titanium Backup can be used to uninstalled unwanted apps and bloat ware. A word of caution before doing this with any pre-installed software, uninstalled essential apps can cause force close errors and even render your handset virtually unusable if not done with care, so I thoroughly recommend backing up your apps and system first, preferably with a recovery zip file too.

Special features

That’s the really important stuff out of the way, but Titanium backup includes plenty of additional advanced features if you want to make the most out of your backups.

Firstly, backup data can be imported from by going to Titanium’s main menu and scrolling down to the import backup option. So you don’t even need to store all your backups on your handset, the files can easily be moved back and forth from your PC to your phone.

TI extra options
Slower compression will save on storage space, but be prepared to wait a little while while backups are performed.
If you’re short of internal memory storage, there’s also the option to move apps to the SD card. However, this will cause certain apps to malfunction, so it’s only recommended to use on software which don’t integrate closely with any other part of Android, such as games.

Titanium Backup features many more options under the configurations menu, including tweaks to the type of compression used to create backups, the maximum number of backups to keep for each app, and whether or not to store market links for apps. In fact, apps can even be disconnected from the marketplace, so automatic updates can be left on for apps but then manually disconnected for certain apps, if you so desire.

Cloud backups

An extra feature for those who purchase the PRO edition is the ability to send backup data to various online services, including Dropbox and Google Drive. Although not essential, these options are very helpful if you need to wipe your SD card, or if your SD card ever develops a fault. To enable syncing to one of these services, tap your phone’s menu button and then go to “Preferences”, the options are under “cloud sync settings”.

And that concludes our guide on Titanium Backup. Hopefully that’s everything you need to protect your handset from unexpected faults.


 Download
Download


 Mirror
Mirror

:Video:


How To Root Android the Easy Way ?


How To Root Android the Easy Way

As the world slowly awakens to the power of android devices, more users are looking for additional customization, and to exploit the true power of various Android operating systems. To gain this type of access, many users are learning to root android devices. While initially a daunting and somewhat risky proposition, we’re going to show you how to root android devices, quickly and easily.


Why would I need to learn how to root android devices?


Aside from gaining root level privileges to control every aspect of the phone’s operating system in much the same way an administrator can make changes to a window’s PC, rooting  android devices adds value to your android device  in the following ways:


Customized appearance

After you’re done rooting your android phone you will be able to customize every aspect of your phone’s on-screen appearance, from colors which apps can be shown where, to changing themes, you will have complete control over the look and feel of your device’s screen.


Save Apps to your SD card

Once rooted, you will have the ability to store and launch apps from your SD card. Doing so can greatly increase the speed and responsiveness of your android device. By moving infrequently used files to the SD card, you free up space in the system memory which allows the device to perform faster.


Get apps from other android builds

When you root your android device, you essentially can load hybrid ROMs that facilitate the use of apps designed for more recent OS builds than ones your phone may support in its factory configuration. This can allow you to extend the useable life of your phone, saving you money!


Wi-Fi and Bluetooth tethering

After you learn how to root android phones, you gain the ability to tether the device to other Bluetooth and Wi-Fi enabled devices. This means that you can use your phone as a hotspot or access point without paying for an additional data plan. This feature alone can save users hundreds of dollars per year!


How to root your device


There are multiple ways you can root your device, but they are basically broken down into two methods; do-it-yourself, or use a professionally created software package.


Method #1: DIY


The first method requires you to do a little research to ensure you get the correct rom build for your device. Once you have downloaded and uncompressed the ROM, you will need to install it onto your device. This is where things can get sticky as a botched install can “brick” your device rendering it inoperable. If this happens you will not be able to get assistance from the manufacturer or your carrier to restore the device. Because of the inherent risk of this method, it’s important to understand your alternatives


Method #2: Professional software solutions


Unlike the do-it-yourself method; this method uses professionally developed software selects the correct ROM and offers a 1-click installation. You remove much of the potential for operator error, thus greatly increasing the chances for a successful root of your android device.


The best way to root android devices


Our recommendation for how to root android devices is to use a professional software solution. We have had excellent success with a software package that is as easy as 1-2-3. Just download the software, connect your android device to your PC, and root your device. Backed with a satisfaction guarantee, we haven’t found a better way to root your android phone.


Disadvantages


There are two main disadvantages to rooting and Android phone;

Rooting immediately voids your phone's warranty-Once rooted, don't try to bring your phone back for service or warranty work.  You are on your own!

Rooting involves the risk of "bricking" your phone-In essence, a "bricked" phone is no better than carrying around a brick in your pocket. The phone is dead when it has been "bricked."
Other potential disadvantages, though less severe, are still worthy of consideration;

Poor performance-Though the intention of "rooting" a phone is to give the phone more performance, several users have found that, in their attempts to speed up the phone or add additional features, that their phones lost both performance speed and features. Remember that when you "root" your Android phone, you are making changes to the stock operating system.

Viruses-Yes, even phones can get viruses. A common practice that people do with "rooted" phones is to flash their ROM's with custom programs. Whenever you make changes to the code of a software, you run the risk of introducing a virus.

Advantages


"Rooting" your Android phone does afford you numerous benefits, including;

Running special applications-Superuser is an app that can only be run on a rooted Android phone. This allows you to control which apps have access to the "root" system. Another popular application that "rooting" affords is the ability to tether a computer to your Android phone so that the computer can access the Internet using the phone's data connection. Another program can allow your Android to be used as a WiFi Hotspot without having to pay your provider for the feature.

Freeing up memory-When you install an app on your phone, it is stored on the phone's memory. "Rooting" allows you to move installed applications to your SD card, thus freeing up system memory for additional files or apps.

Custom ROM's-This is the most powerful feature of "rooted" phones. There are hundreds of custom ROM's that can do anything from speeding up the processing speed of your phone to changing the entire look and feel of your phone.
Summary

The decision to "root" your Android phone is one that should not be rushed into. Though the allure of having an unlocked phone is powerful, having a "bricked" phone is, trust me, not very much fun. 


 Take an Example :::::::::::


.................................................................Let's Enjoy Rooting.................................................................

Android Root Toolkit


Description
ANDROID ROOT TOOLKIT

I wrote this little root utility for myself to help consolidate and automate some root functions that are available in various other apps, but nowhere all together.
Note: this utility does not root your Android device--it assumes that your device is already rooted.
FEATURES:
* display current root, /system and root (/) mount status, and root save status; will also display bootloader lock status for the Samsung Galaxy Nexus
* reboot options (normal, recovery, bootloader)
* power off device
* remount rootfs (/) and/or /system in read-write or read-only mode; note: remount behavior changed in Android 4.2 and higher that causes remount effect to not
be usable by apps other than the one that initiated the remount
* save (protect) / restore root function; for 4.2 devices with ext2/3/4 /system partitons, a copy of su binary can be saved and later restored; for 4.3
devices, I've implemented Pau Oliva's 4.3+ "OTA rootkeeper" functionality (i.e., via keeproot.sh)
* freeze (disable) or thaw (enable) an application (use caution when freezing a system app!); you can select showing user and/or system apps in the Freeze/Thaw Display Options in the Preferences/Settings menu
* display system (getprop) property values
* Samsung Galaxy Nexus, LG Nexus 5, and Nexus 7 (1st gen) only options:
-- flash a stock recovery
-- flash various custom recoveries
-- make recovery "stick" (keep stock recovery from overwriting your custom recovery)
-- identify currently installed recovery
-- bootloader lock, unlock, status (Galaxy Nexus only)
* option to turn confirmation mode on / off (defaults to on)
* option to turn "safe mode" on for the app to prevent any su or flashing operation from occurring

Warning / disclaimer: the author of this app is not responsible for any loss or damage caused by or related to its use.
If you are not comfortable with or knowledgeable about the proper use and functionality of this app, please discontinue its use and uninstall.


PERMISSIONS:
INTERNET - for downloading recoveries from the internet
WRITE_EXTERNAL_STORAGE - this is for the downloaded recoveries and work files used to identify which recovery is currently installed
ACCESS_SUPERUSER permission to support interaction with SuperSU


Keywords: root status, root checker, mount status, flash stock recovery, flash custom recovery, reboot recovery, reboot bootloader, power off device, remount
system, make recovery stick, identify recovery, save root, restore root, freeze app, disable app, thaw app, enable app, bootloader lock, bootloader unlock, bootloader
status, getprop, system properties

 Download
Download

 Mirror
Mirror